본 절은 [EC 센서 (SKU:DFR0300)] 아두이노 센서(16X2LCD)를 사용하기 위해 알아야 할 내용과 실습 방법에 대해 설명한다. 아두이노 센서의 특징, 동작원리, 사양, 연결 핀 배열, 출력 값, 주의사항을 알아본다. 간단한 코딩으로 센서를 쉽게 실습할 수 있다.
목차
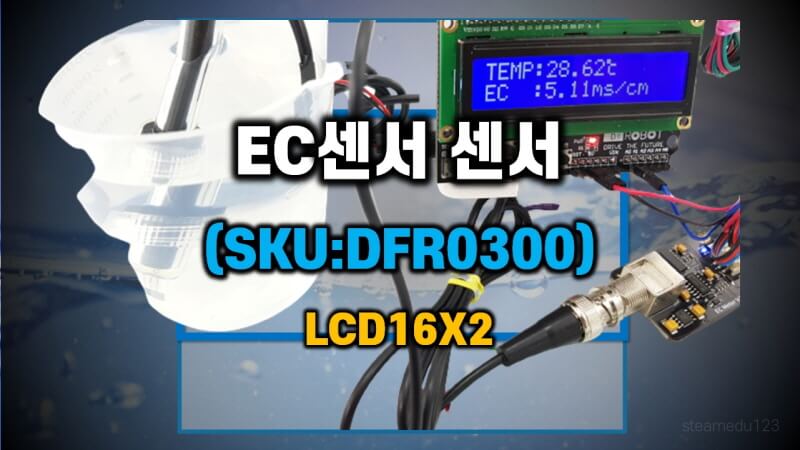
SKU DFR0300 전기전도도 아두이노 센서(16X2 LCD)
SKU DFR0300 전기전도도 센서란?
EC 센서(DFRot Gravity SKU:DFR0300)는 전기 전도도를 측정하는 센서이다. 아날로그 전기 전도도 측정기는 수용액의 전기 전도도를 측정하고 수질을 평가하는 데 특별히 사용되며 수질 모니터링, 양식업, 수경재배, 아쿠아포닉스 등 환경 물 감지 및 기타 분야에서 자주 사용된다.
SKU DFR0300 전기전도도 아두이노 센서 에서 자세히 알아볼 수 있다.
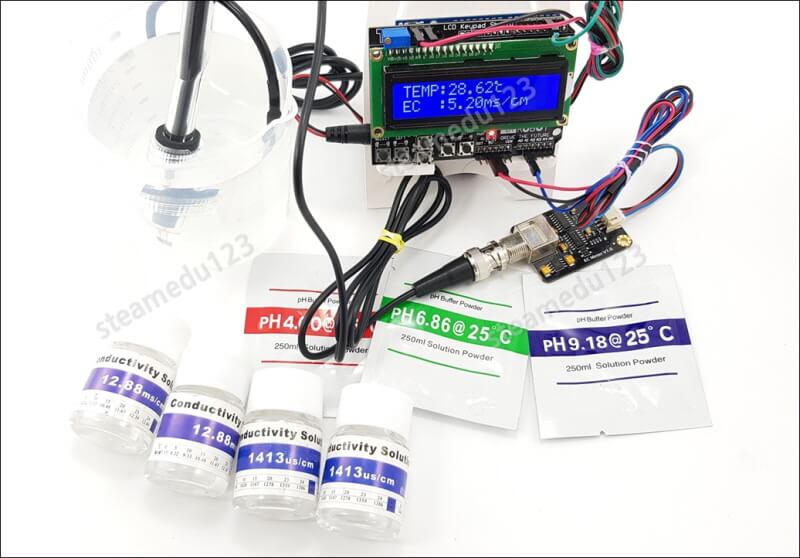
LCD16X2 아두이노 키패드 실드와 온도센서를 연결하여 실시간으로 EC센서를 측정할 수 있다.
LCD 1602 Keypad shield
LCD1602 keypad sheild 는 알리익스프레스, 네이버 쇼핑몰, 아마존 등에서 센서를 구입할 수 있다

특성
운영 전압: 4.5-5.5V
작동 현재: 2.0mA (5.0V)
모듈 최고의 작동 전압: 5.0V
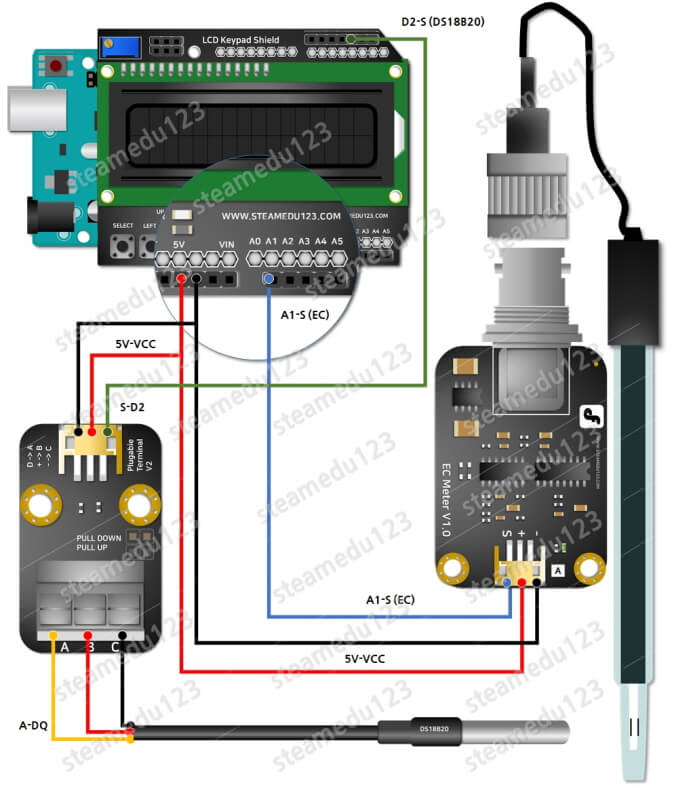
SKU DFR0300 전기전도도 센서 하드웨어 연결
다음과 같이 아두이노 센서를 연결할 수 있다. 측정 정확도를 보장하기 위해 온도 센서를 추가하여 온도를 측정하고 자동 온도 보상을 달성하는 것이 좋다. DS18 B20 방수 온도 센서를 사용할 수 있다.
[주의사항]
다른 액체를 측정하기 전에 반드시 프로브를 세척해야 한다. 액체의 오염을 방지하기 위해 종이로 잔여 물방울을 흡수하고 증류수로 프로브를 세척할 수 있다.
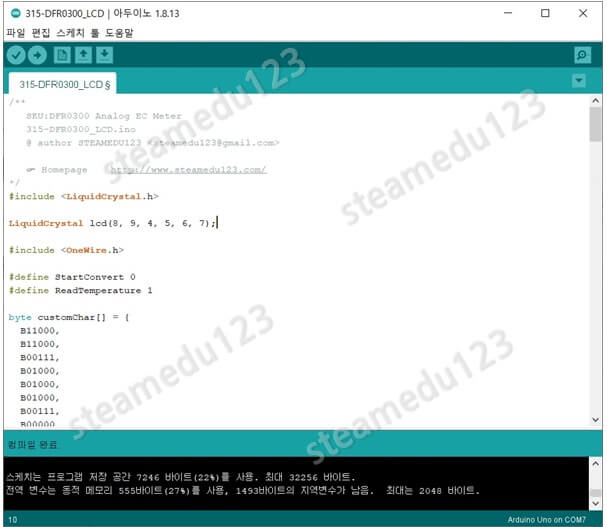
SKU DFR0300 전기전도도 센서 소프트웨어 코딩
하드웨어 연결이 완료되면, 아두이노 IDE를 이용해 아두이노 센서 소스코드를 코딩할 수 있다. LCD16X2 키패드 실드와 DS18B20 방수 온도 센서를 사용하여 EC를 측정하는 한다.
센서 코드는 다음과 같다.
#include <LiquidCrystal.h>

LiquidCrystal lcd(8, 9, 4, 5, 6, 7);

#include <OneWire.h>

#define StartConvert 0
#define ReadTemperature 1

byte customChar[] = {
  B11000,
  B11000,
  B00111,
  B01000,
  B01000,
  B01000,
  B00111,
  B00000
};

byte ECsensorPin = A1;
byte DS18B20_Pin = 2;

float ECcurrent;
unsigned int AnalogSampleInterval = 25;
unsigned long AnalogValueTotal = 0;
unsigned int AnalogAverage = 0, averageVoltage = 0;
unsigned long AnalogSampleTime, printTime, tempSampleTime;
const byte numReadings = 20;
unsigned int readings[numReadings];
byte index = 0;

float temperature;
unsigned int tempSampleInterval = 850;

unsigned int printInterval = 700;


OneWire ds(DS18B20_Pin);

void setup() {
  Serial.begin(115200);

  initLCD();
  initSensor();
}

void loop() {
  EC_read();
  DS18B20_read();

  displayLCD();
}


//----------------------------------------------------------------------------

void initSensor() {
  for (byte thisReading = 0; thisReading < numReadings; thisReading++) {
    readings[thisReading] = 0;
  }

  TempProcess(StartConvert);

  AnalogSampleTime = millis();
  printTime = millis();
  tempSampleTime = millis();
}

void EC_read() {
  if (millis() - AnalogSampleTime >= AnalogSampleInterval) {
    AnalogSampleTime = millis();
    AnalogValueTotal = AnalogValueTotal - readings[index];
    readings[index] = analogRead(ECsensorPin);
    AnalogValueTotal = AnalogValueTotal + readings[index];
    index = index + 1;

    if (index >= numReadings) {
      index = 0;
    }

    AnalogAverage = AnalogValueTotal / numReadings;
  }
}

void DS18B20_read() {
  if (millis() - tempSampleTime >= tempSampleInterval) {
    tempSampleTime = millis();
    temperature = TempProcess(ReadTemperature);
    TempProcess(StartConvert);
  }
}


//----------------------- DS18B20 -------------------------------------------

float TempProcess(bool ch)
{
  //returns the temperature from one DS18B20 in DEG Celsius
  static byte data[12];
  static byte addr[8];
  static float TemperatureSum;

  if (!ch) {
    if ( !ds.search(addr)) {
      Serial.println("no more sensors on chain, reset search!");
      ds.reset_search();
      return 0;
    }

    if ( OneWire::crc8( addr, 7) != addr[7]) {
      Serial.println("CRC is not valid!");
      return 0;
    }

    if ( addr[0] != 0x10 && addr[0] != 0x28) {
      Serial.print("Device is not recognized!");
      return 0;
    }

    ds.reset();
    ds.select(addr);
    ds.write(0x44, 1);

  } else {
    byte present = ds.reset();
    ds.select(addr);
    ds.write(0xBE);

    for (int i = 0; i < 9; i++) {
      data[i] = ds.read();
    }

    ds.reset_search();
    byte MSB = data[1];
    byte LSB = data[0];
    float tempRead = ((MSB << 8) | LSB);

    TemperatureSum = tempRead / 16;
  }

  return TemperatureSum;
}

//----------------------- Display -------------------------------------------
void initLCD() {
  lcd.begin(16, 2);
  lcd.createChar(0, customChar);

  lcd.setCursor(0, 0);
  lcd.print("SKU:DFR0300");
  lcd.setCursor(0, 1);
  lcd.print("EC Meter");
  delay(1000);
  lcd.clear();
}

void displayLCD() {
  /*
    Every once in a while,print the information on the serial monitor.
  */
  if (millis() - printTime >= printInterval) {
    printTime = millis();
    averageVoltage = AnalogAverage * (float)5000 / 1024;

    Serial.print("Analog value:");
    Serial.print(AnalogAverage);   //analog average,from 0 to 1023
    Serial.print("    Voltage:");
    Serial.print(averageVoltage);  //millivolt average,from 0mv to 4995mV
    Serial.print("mV    ");
    Serial.print("temp:");
    Serial.print(temperature);    //current temperature
    Serial.print("^C     EC:");

    lcd.clear();
    lcd.setCursor(0, 0);
    lcd.print("TEMP:");
    lcd.print(temperature);
    lcd.write(byte(0));

    lcd.setCursor(0, 1);

    float TempCoefficient = 1.0 + 0.0185 * (temperature - 25.0);
    float CoefficientVolatge = (float)averageVoltage / TempCoefficient;

    if (CoefficientVolatge < 150) {
      Serial.println("No solution!");
      lcd.print("No solution!");
    } else if (CoefficientVolatge > 3300) {
      Serial.println("Out of the range!");
      lcd.print("Out of the range!");
    } else {
      if (CoefficientVolatge <= 448) {
        ECcurrent = 6.84 * CoefficientVolatge - 64.32;
      } else if (CoefficientVolatge <= 1457) {
        ECcurrent = 6.98 * CoefficientVolatge - 127;
      } else {
        ECcurrent = 5.3 * CoefficientVolatge + 2278;
      }

      ECcurrent /= 1000;  //convert us/cm to ms/cm

      Serial.print(ECcurrent, 2); //two decimal
      Serial.println("ms/cm");

      lcd.print("EC  :");
      lcd.print(ECcurrent, 2);
      lcd.print("ms/cm");
    }
  }
}
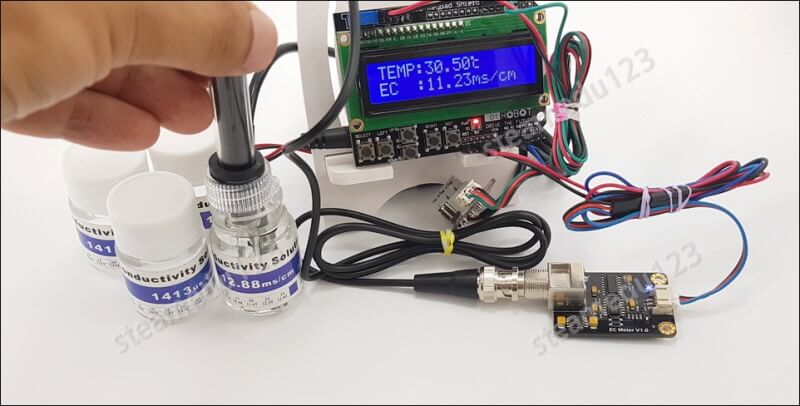
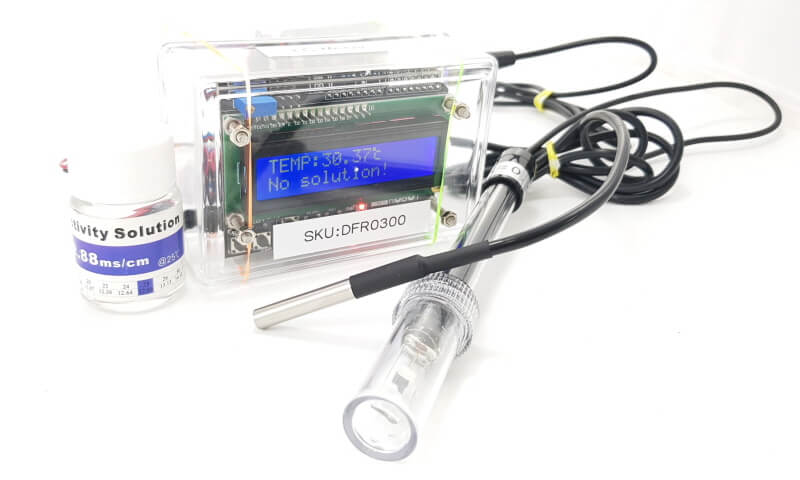
센서 동작확인
하드웨어 연결, 소프트웨어 코딩이 완료되면 다음과 같이 동작 화면을 확인할 수 있다.
------------------------------------------------------
개발환경 : WINDOWS 10
아두이노 IDE : 1.8.13
------------------------------------------------------
01 연결
- 아두이노와 PC 연결
- 아두이노 IDE 실행
- 메뉴 → 툴 → 보드:아두이노 UNO 확인
- 메뉴 → 스케치 → 확인/컴파일
02 컴파일 확인
다음과 같이 컴파일 확인을 한다. onewire.h 에러가 발생한다면 아두이노 IDE 라이브리를 이용해 라이브러리를 추가하면 된다
03 아두이노 우노 업로드
04 동작 확인
마무리
LCD16X2 키패드실드를 이용해 실시간으로 EC 의 상태를 확인할 수 있다. [EC 센서 (SKU:DFR0300)] 아두이노 센서(LCD 16X2)를 사용하기 위해 알아야 할 내용과 실습 방법에 대해 설명하였다. 아두이노 센서의 특징, 동작원리, 사양, 연결 핀 배열, 출력 값, 주의사항을 알아본다. 아두이노와 센서를 연결하고, 간단한 코딩으로 센서를 쉽게 실습할 수 있다.
모두의 아두이노 환경 센서
[모두의 아두이노 환경 센서] 책은 예스24, 인터넷 교보문고, 알라딘, 영풍문고, 반디앤루니스 등에서 구입할 수 있다. 이 책에서는 PMS7003, GP2Y1010AU0F, PPD42NS, SDS011 미세먼지 센서, DHT22 온습도 센서, MH-Z19B 이산화탄소 센서, ZE08-CH2O 포름알데히드 센서, CCS811 총휘발성유기화합물 TVOC, GDK101 방사선(감마선) 센서, MQ-131 오존(O3) 센서, MQ-7 일산화탄소, MICS-4514 이산화질소 센서, MICS-6814 암모니아 센서, DGS-SO2 아황산가스(SO2) 센서, BME280 기압 센서, GUVA-S12SD 자외선(UV) 센서, MD0550 기류 센서, QS-FS01 풍속 센서(Wind speed) 를 사용한다.
모두의 아두이노 환경 센서
아두이노와 센서로 내 건강을 지킬 수 있다!다양한 환경 센서를 실생활 프로젝트에 응용해보자!시중에 판매되고 있는 간이측정기도 센서로 값을 측정합니다. 똑같은 센서를 아두이노에 연결하
book.naver.com
'모두의 아두이노 센서 > 아두이노 센서 (물)' 카테고리의 다른 글
| DS18B20 센서 동작확인 (LCD1602 I2C) (0) | 2021.05.04 |
|---|---|
| DS18B20 센서 동작확인 (LCD16X2 키패드실드) (0) | 2021.05.04 |
| MH-RD 빗물 감지 아두이노 센서(LCD16X2 키패드실드) (0) | 2021.05.04 |
| T1529P 수위감지 아두이노 센서(LCD16X2 키패드실드) (0) | 2021.05.04 |
| SKU DFR0300 전기전도도 아두이노 센서 (0) | 2021.05.03 |
| T1529P 수위감지 아두이노 센서 (0) | 2021.04.27 |
| MH-RD 빗물 감지 아두이노 센서 (0) | 2021.04.27 |
| DS18B20 방수 온도 아두이노 센서 (0) | 2021.04.26 |


댓글