본 연구의 목표는 큐브셋을 통해 우주 시스템을 이해하고 창의 임무 설계, 요구 조건 분석, 그리고 시스템 기본 설계 및 제작을 통해 학교에서 배워온 지식을 실제 응용하여 공학과 과학의 관계와 차이를 배우고 관련 전공에 대한 흥미를 유발하기 위함에 있다. 다양한 환경센서를 성층권에서 측정하는데 목적이 있다.
목차
CubeSat - OV5642 ArduCam Mini Module Camera Shield 5MP Plus
ArduCAM 이란?
ArduCAM은 다음과 같다.
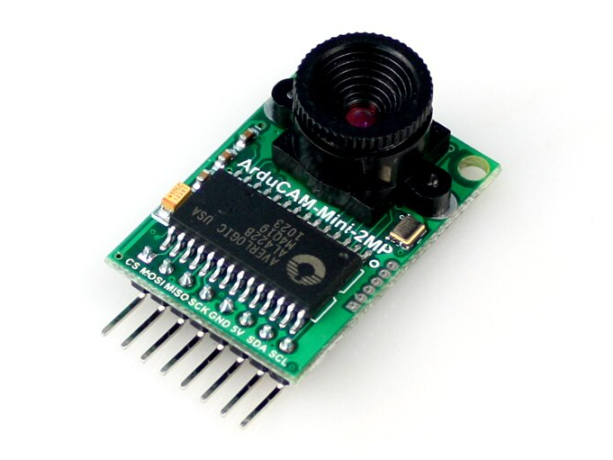
* Arduino와 호환되는 Arducam의 5MP Plus 범용 SPI 카메라
* Arducam Mini Module Camera Shield 5MP Plus OV5642 카메라 모듈은 범용 고화질 5MP SPI 카메라로 카메라 제어 인터페이스의 복잡성을 줄인다.
* 5MP CMOS 이미지 센서 OV5642를 통합하고 소형 크기와 사용하기 쉬운 하드웨어 인터페이스 및 오픈 소스 코드 라이브러리를 제공한다.
* Arducam mini 는 SPI 및 I2C 인터페이스가 있고 표준 Arduino 보드와 잘 결합될 수 있는 한 Arduino, Raspberry Pi, ESP8266 , Maple, Chipkit, Beaglebone black 과 같은 모든 플랫폼에서 사용할 수 있다.
* JPEG 압축 모드, 단일 및 다중 촬영 모드, 단편 영화 녹화, 한 번 캡처 다중 읽기 작업, 버스트 읽기 작업, 저전력 모드 등을 지원한다.
* IoT, 로봇, 야생동물, HDR 및 기타 배터리 구동 제품 또는 과학 이미지 처리 애플리케이션에 사용할 수 있다.
[응용분야]
* 사물인터넷 카메라
* 로봇 카메라
* 야생 동물 카메라
* 기타 배터리 구동 제품
* MCU, Raspberry Pi, ARM, DSP, FPGA 플랫폼에서 사용
ArduCAM 특징
ArduCAM 특징은 다음과 같다.
* 5MP 이미지 센서 OV5642
* 변경 가능한 렌즈 옵션이 있는 M12 마운트 또는 CS 마운트 렌즈 홀더
* 적절한 렌즈 조합으로 IR 감지
* 센서 구성을 위한 I2C 인터페이스
* 카메라 명령 및 데이터 스트림을 위한 SPI 인터페이스
* 모든 IO 포트는 5V/3.3V 허용
* JPEG 압축 모드, 단일 및 다중 촬영 모드, 한 번 캡처 다중 읽기 작업, 버스트 읽기 작업, 저전력 모드 등을 지원.
* 표준 Arduino 보드와 잘 결합됨
* Arduino, STM32, Chipkit, Raspberry Pi, BeagleBone Black용 오픈 소스 코드 라이브러리 제공
* 작은 형태의 요소
https://www.arducam.com/product/arducam-5mp-plus-spi-cam-arduino-ov5642/
Arducam 5MP Plus OV5642 Mini Module Camera Shield SPI Camera Module for Arduino UNO Mega2560 Board & Raspberry Pi Pico - Arducam
Arducam's 5MP Plus general-purpose SPI Camera which is Arduino Compatible Arducam Mini Module Camera Shield 5MP Plus OV5642 Camera Module is a general purpose high definition 5MP SPI camera, reducing the complexity of the camera control interface It int
www.arducam.com
[사양]
* 전원 3.3V~5V
* 활성 어레이 크기: 2592×1944
* SPI 속도: 최대 8MHz
* 셔터: 롤링 셔터
* 프레임 버퍼: 8MByte
* 픽셀 크기: 1.4µm x 1.4µm
* 기본 M12 렌즈: 55°
* 해상도 지원: 5MP, 1080p, 720p, VGA, QVGA
* 형식 지원: RAW, YUV, RGB, JPEG
* 크기: 34x24mm
* 무게: 20g
* 온도: -10°C~+55°C
* 렌즈 사양: 센서 크기: 1/4″; EFL: 4.9mm; F/N:2.2; BFL: 1.2mm; HFOV: 60도(SKU: U6067)
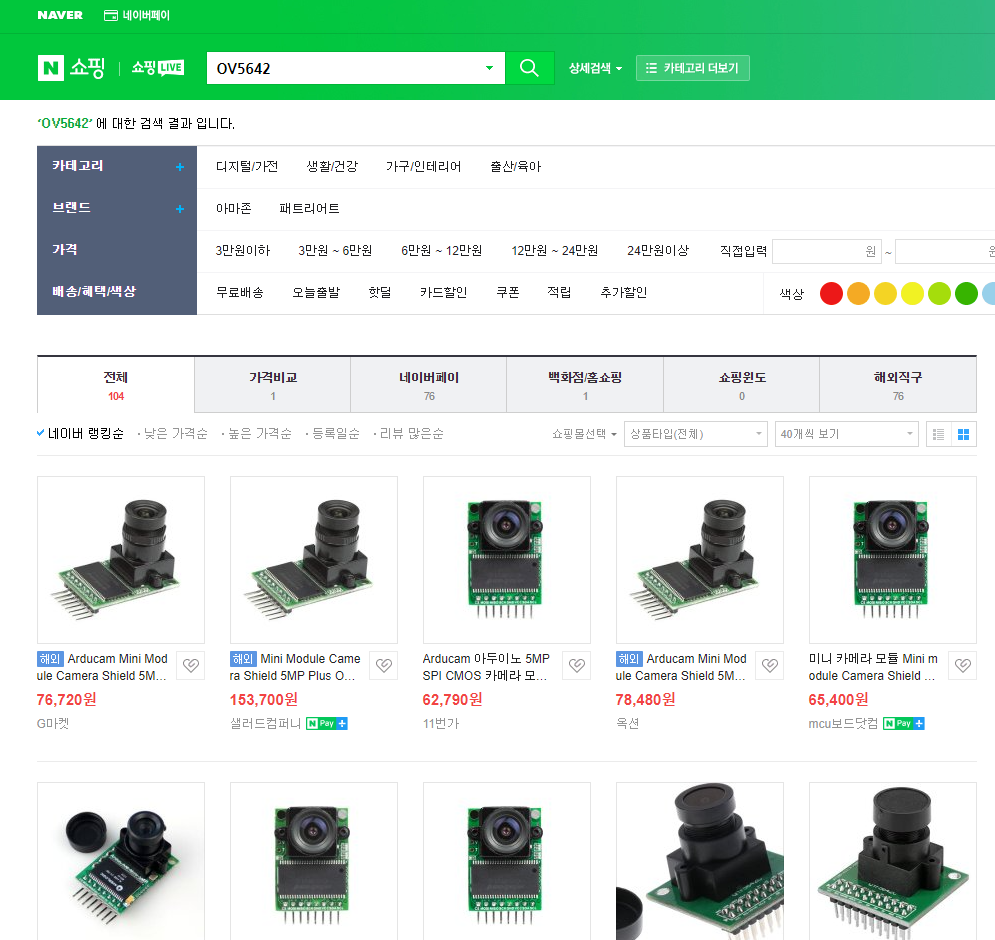
ArduCAM 센서 구입하기
[ArduCAM 센서]는 알리익스프레스, 네이버 쇼핑몰, 아마존 등에서 센서를 구입할 수 있다
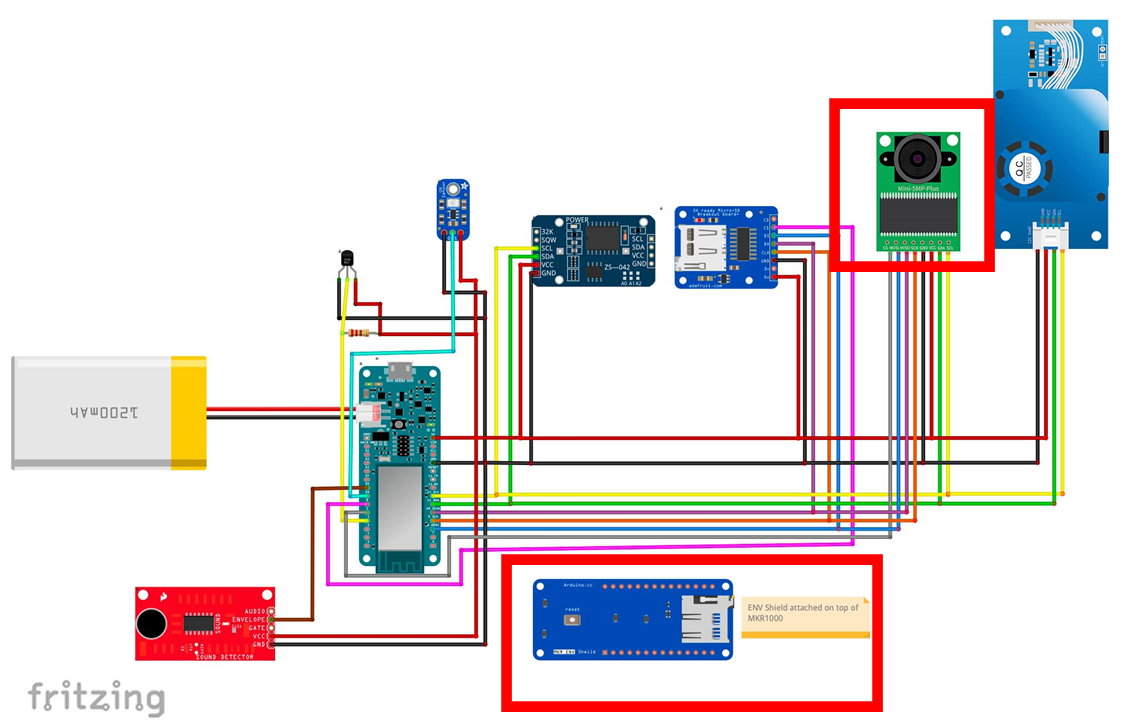
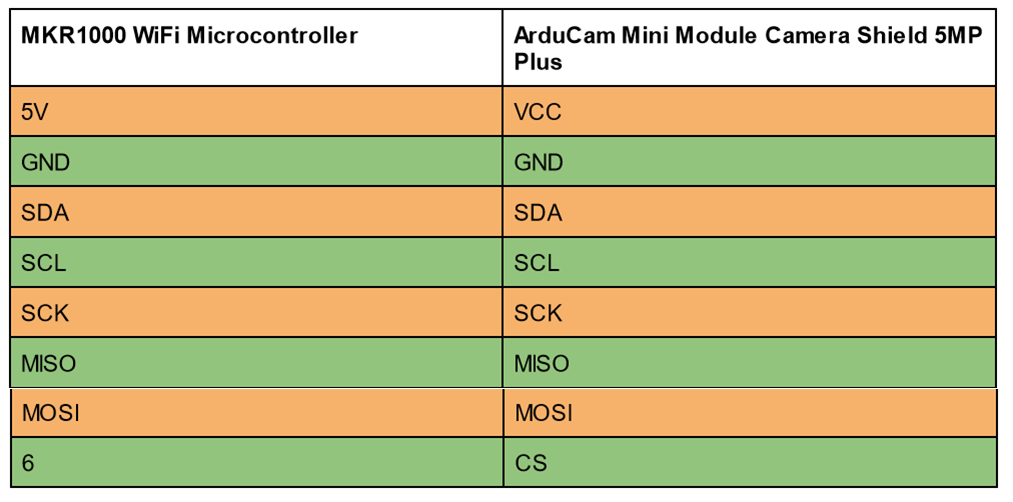
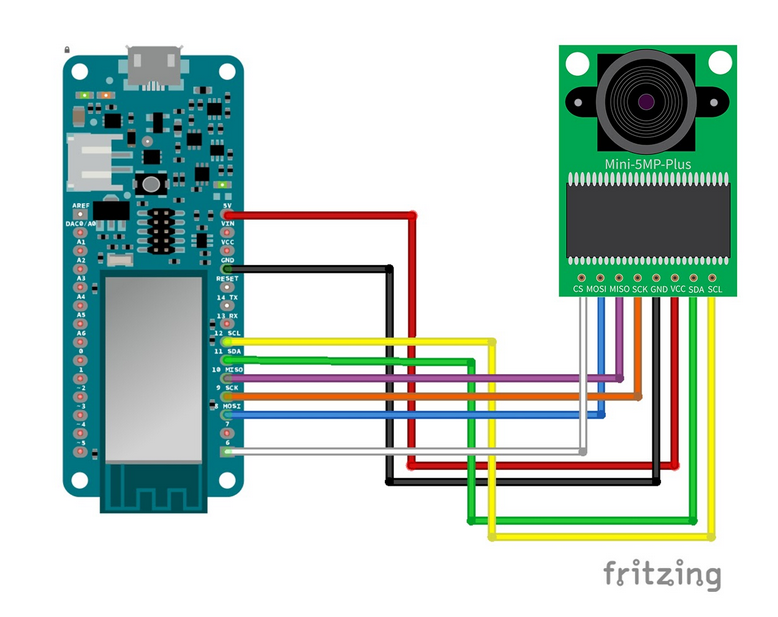
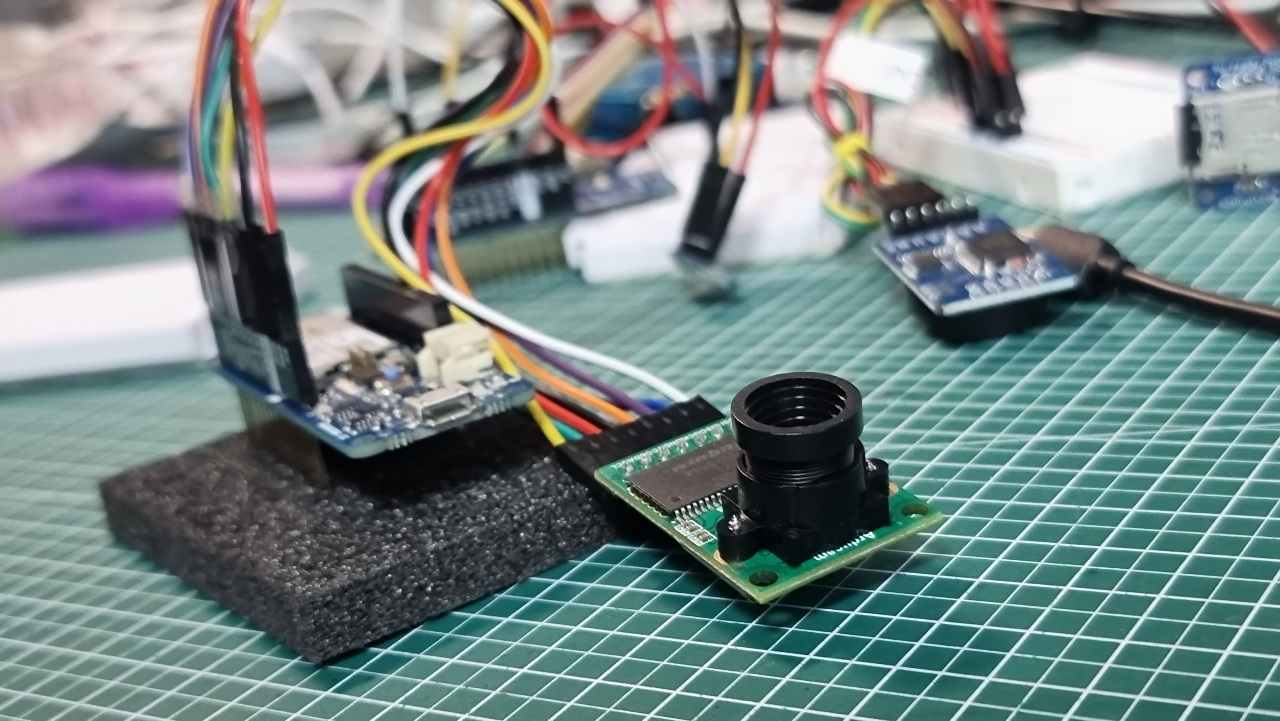
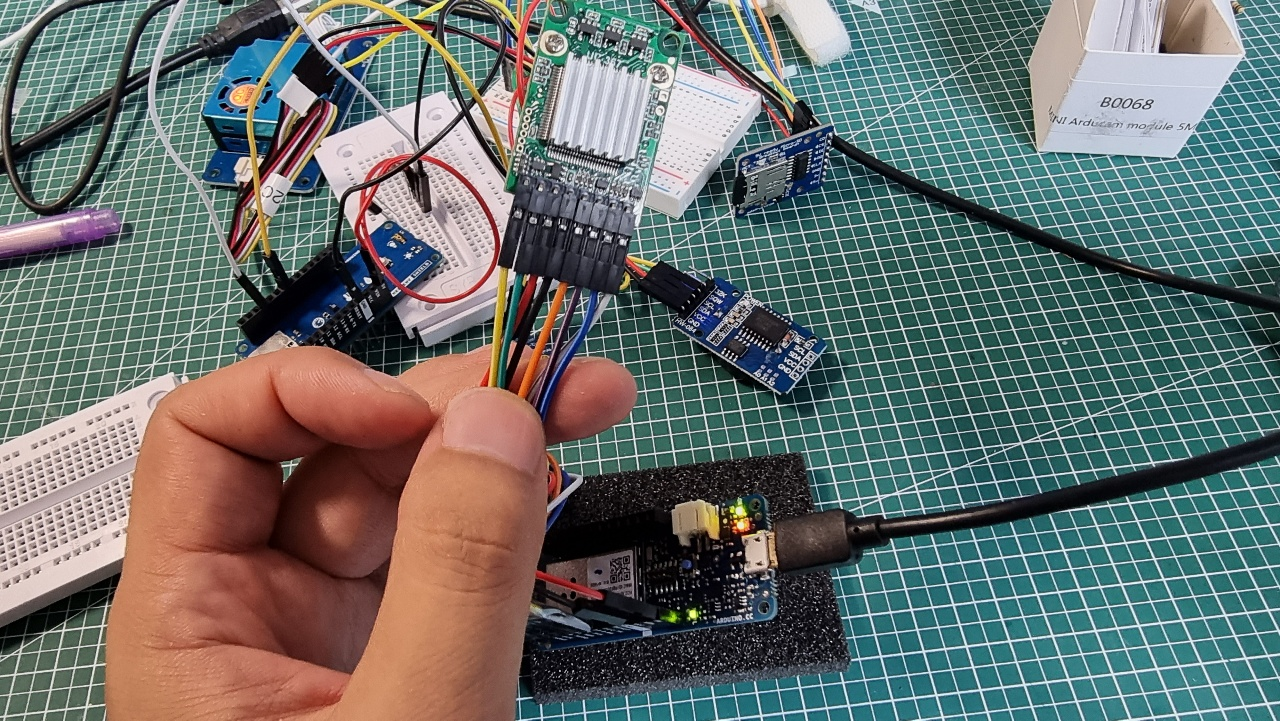
ArduCAM 센서 하드웨어 연결
다음과 같이 ArduCAM 아두이노 센서를 연결할 수 있다.
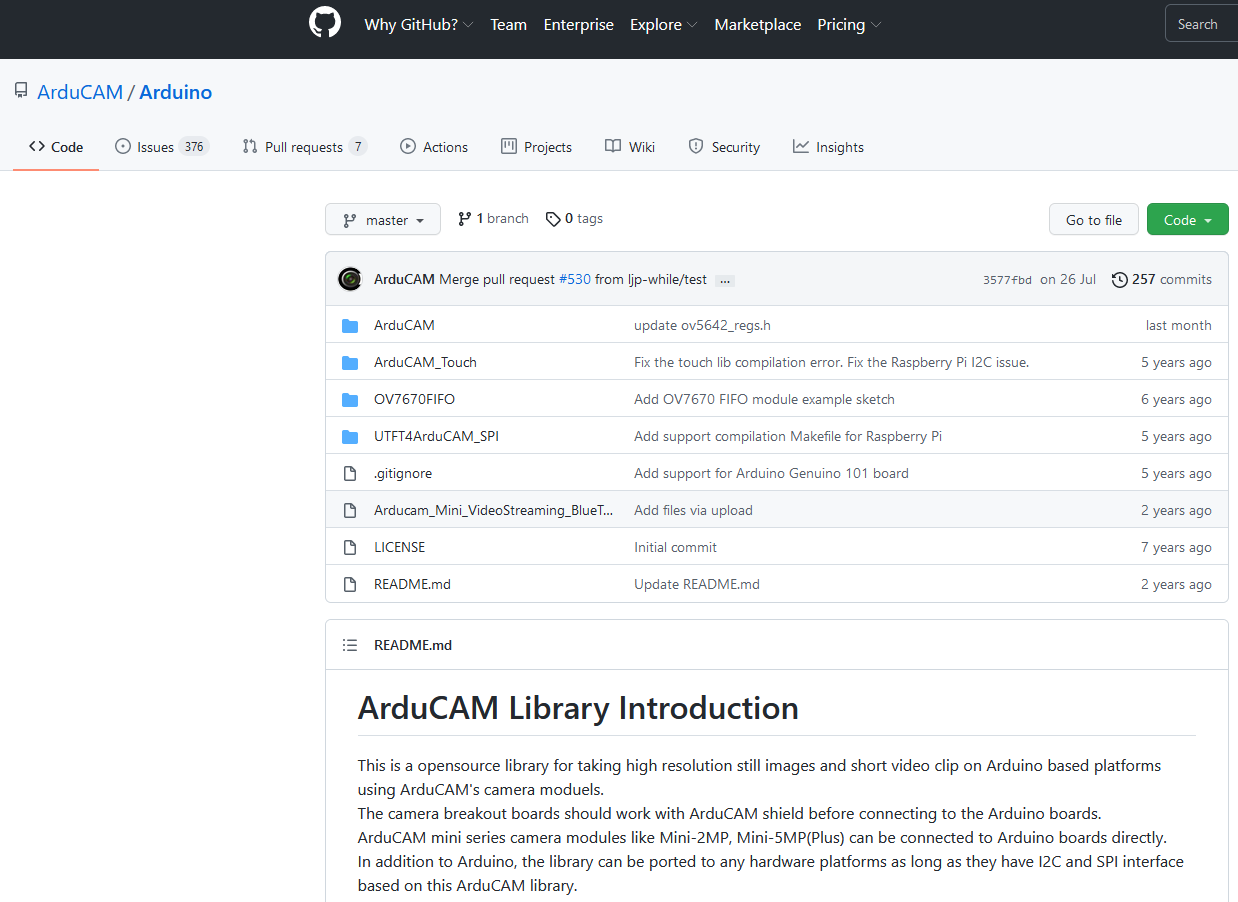
ArduCAM 센서 라이브러리
라이브러리는 다음과 같다.
https://github.com/ArduCAM/Arduino
GitHub - ArduCAM/Arduino: This is ArduCAM library for Arduino boards
This is ArduCAM library for Arduino boards. Contribute to ArduCAM/Arduino development by creating an account on GitHub.
github.com
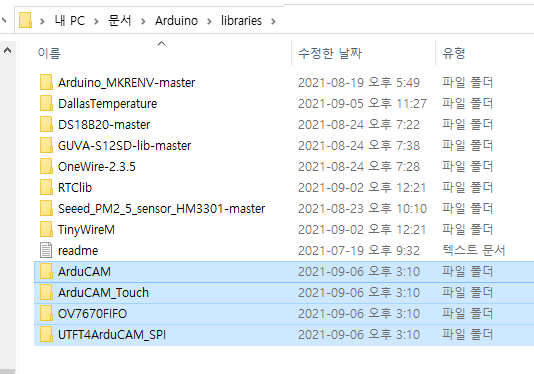
01 다운로드 받은 라이브러리를 압축푼다.
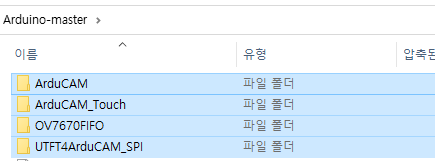
02 아두이노 라이브러리 폴더에 복사한다.
ArduCAM 센서 소프트웨어 코딩
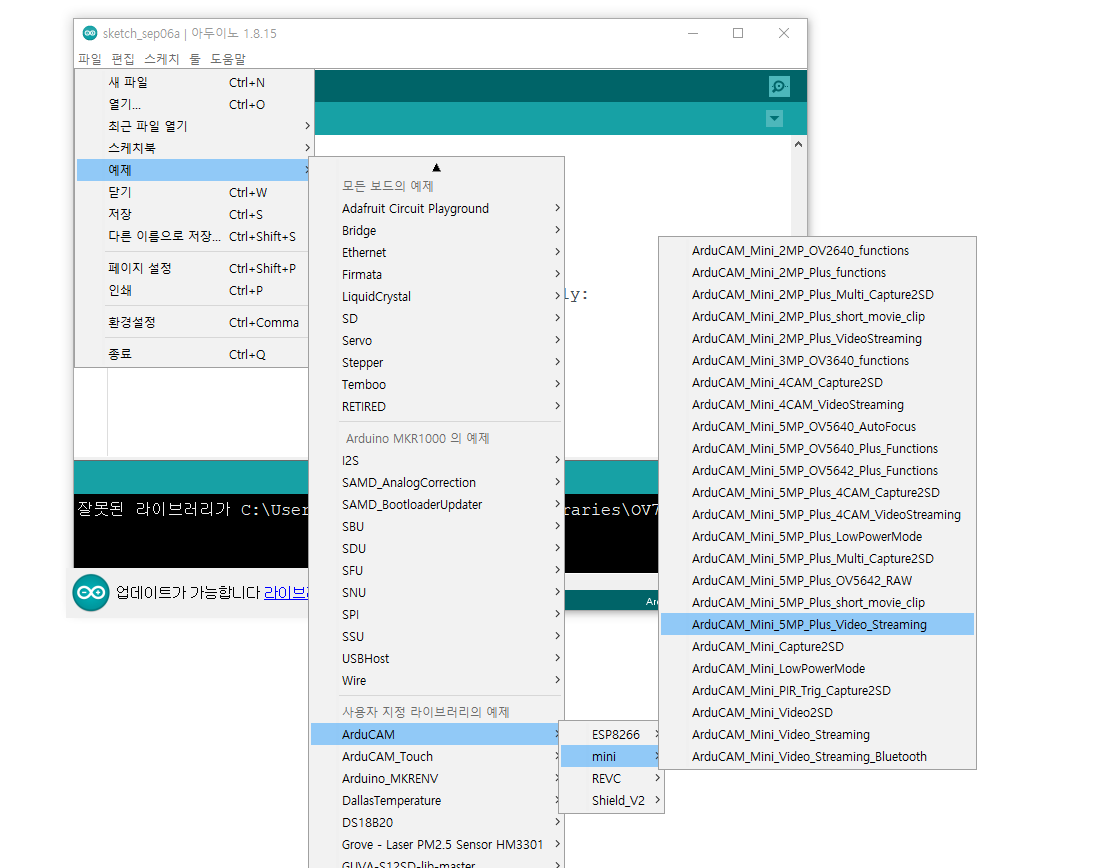
하드웨어 연결이 완료되면, 아두이노 IDE를 이용해 아두이노 센서 소스코드를 코딩할 수 있다.
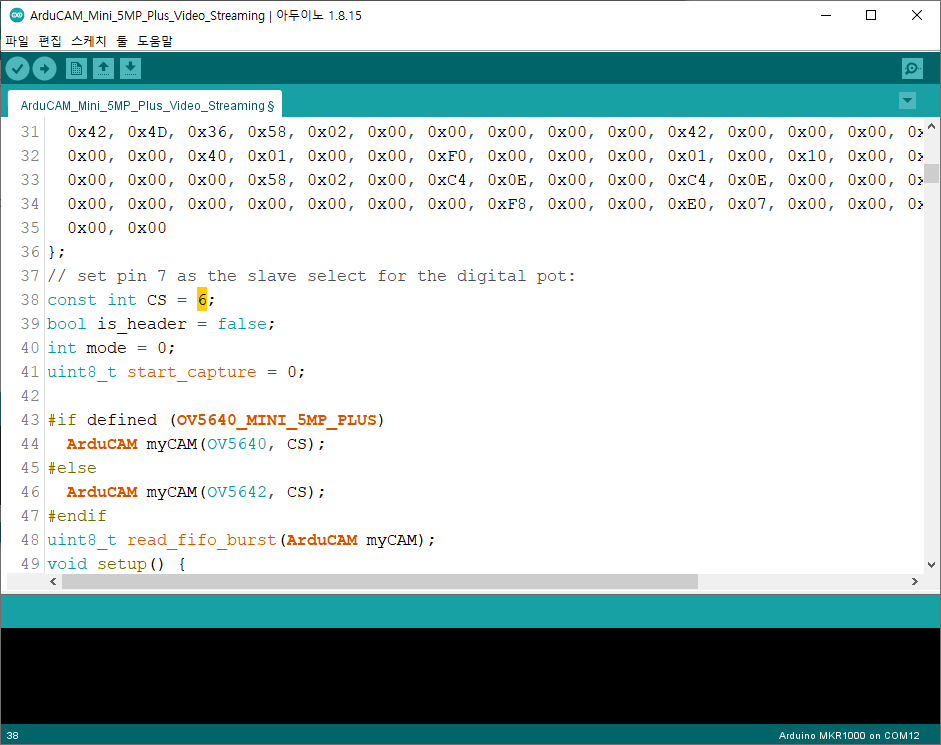
CS를 7에서 6으로 변경한다.
센서 코드는 다음과 같다.
// ArduCAM Mini demo (C)2017 Lee
// Web: http://www.ArduCAM.com
// This program is a demo of how to use most of the functions
// of the library with ArduCAM Mini 5MP camera, and can run on any Arduino platform.
// This demo was made for ArduCAM_Mini_5MP_Plus.
// It needs to be used in combination with PC software.
// It can take photo continuously as video streaming.
//
// The demo sketch will do the following tasks:
// 1. Set the camera to JPEG output mode.
// 2. Read data from Serial port and deal with it
// 3. If receive 0x00-0x08,the resolution will be changed.
// 4. If receive 0x10,camera will capture a JPEG photo and buffer the image to FIFO.Then write datas to Serial port.
// 5. If receive 0x20,camera will capture JPEG photo and write datas continuously.Stop when receive 0x21.
// 6. If receive 0x30,camera will capture a BMP  photo and buffer the image to FIFO.Then write datas to Serial port.
// 7. If receive 0x11 ,set camera to JPEG output mode.
// 8. If receive 0x31 ,set camera to BMP  output mode.
// This program requires the ArduCAM V4.0.0 (or later) library and ArduCAM_Mini_5MP_Plus
// and use Arduino IDE 1.6.8 compiler or above
#include <Wire.h>
#include <ArduCAM.h>
#include <SPI.h>
#include "memorysaver.h"
//This demo can only work on OV5640_MINI_5MP_PLUS or OV5642_MINI_5MP_PLUS platform.
#if !(defined (OV5640_MINI_5MP_PLUS)||defined (OV5642_MINI_5MP_PLUS))
#error Please select the hardware platform and camera module in the ../libraries/ArduCAM/memorysaver.h file
#endif
#define BMPIMAGEOFFSET 66
const char bmp_header[BMPIMAGEOFFSET] PROGMEM =
{
  0x42, 0x4D, 0x36, 0x58, 0x02, 0x00, 0x00, 0x00, 0x00, 0x00, 0x42, 0x00, 0x00, 0x00, 0x28, 0x00,
  0x00, 0x00, 0x40, 0x01, 0x00, 0x00, 0xF0, 0x00, 0x00, 0x00, 0x01, 0x00, 0x10, 0x00, 0x03, 0x00,
  0x00, 0x00, 0x00, 0x58, 0x02, 0x00, 0xC4, 0x0E, 0x00, 0x00, 0xC4, 0x0E, 0x00, 0x00, 0x00, 0x00,
  0x00, 0x00, 0x00, 0x00, 0x00, 0x00, 0x00, 0xF8, 0x00, 0x00, 0xE0, 0x07, 0x00, 0x00, 0x1F, 0x00,
  0x00, 0x00
};
// set pin 7 as the slave select for the digital pot:
const int CS = 6;
bool is_header = false;
int mode = 0;
uint8_t start_capture = 0;

#if defined (OV5640_MINI_5MP_PLUS)
  ArduCAM myCAM(OV5640, CS);
#else
  ArduCAM myCAM(OV5642, CS);
#endif
uint8_t read_fifo_burst(ArduCAM myCAM);
void setup() {
// put your setup code here, to run once:
uint8_t vid, pid;
uint8_t temp;
#if defined(__SAM3X8E__)
  Wire1.begin();
  Serial.begin(115200);
#else
  Wire.begin();
  Serial.begin(921600);
#endif
Serial.println(F("ACK CMD ArduCAM Start! END"));
// set the CS as an output:
pinMode(CS, OUTPUT);
digitalWrite(CS, HIGH);
// initialize SPI:
SPI.begin();

//Reset the CPLD
myCAM.write_reg(0x07, 0x80);
delay(100);
myCAM.write_reg(0x07, 0x00);
delay(100);

while(1){
  //Check if the ArduCAM SPI bus is OK
  myCAM.write_reg(ARDUCHIP_TEST1, 0x55);
  temp = myCAM.read_reg(ARDUCHIP_TEST1);
  if(temp != 0x55)
  {
    Serial.println(F("ACK CMD SPI interface Error! END"));
    delay(1000);continue;
  }else{
    Serial.println(F("ACK CMD SPI interface OK. END"));break;
  }
}
#if defined (OV5640_MINI_5MP_PLUS)
  while(1){
    //Check if the camera module type is OV5640
    myCAM.rdSensorReg16_8(OV5640_CHIPID_HIGH, &vid);
    myCAM.rdSensorReg16_8(OV5640_CHIPID_LOW, &pid);
    if ((vid != 0x56) || (pid != 0x40)){
      Serial.println(F("ACK CMD Can't find OV5640 module! END"));
      delay(1000); continue;
    }else{
      Serial.println(F("ACK CMD OV5640 detected. END"));break;
    }
  }
#else
  while(1){
    //Check if the camera module type is OV5642
    myCAM.rdSensorReg16_8(OV5642_CHIPID_HIGH, &vid);
    myCAM.rdSensorReg16_8(OV5642_CHIPID_LOW, &pid);
    if ((vid != 0x56) || (pid != 0x42)){
      Serial.println(F("ACK CMD Can't find OV5642 module! END"));
      delay(1000);continue;
    }else{
      Serial.println(F("ACK CMD OV5642 detected. END"));break;
    }
  }
#endif
//Change to JPEG capture mode and initialize the OV5642 module
myCAM.set_format(JPEG);
myCAM.InitCAM();
myCAM.set_bit(ARDUCHIP_TIM, VSYNC_LEVEL_MASK);
myCAM.clear_fifo_flag();
myCAM.write_reg(ARDUCHIP_FRAMES, 0x00);
}

void loop() {
uint8_t temp= 0xff, temp_last =0;
bool is_header = false;
if (Serial.available())
{
  temp = Serial.read();
  switch (temp)
  {
    case 0:
    #if defined (OV5640_MINI_5MP_PLUS)
      myCAM.OV5640_set_JPEG_size(OV5640_320x240);delay(1000);
      Serial.println(F("ACK CMD switch to OV5640_320x240 END"));
    #else
      myCAM.OV5642_set_JPEG_size(OV5642_320x240);delay(1000);
      Serial.println(F("ACK CMD switch to OV5642_320x240 END"));
    #endif
    temp=0xff;
    break;
    case 1:
    #if defined (OV5640_MINI_5MP_PLUS)
      myCAM.OV5640_set_JPEG_size(OV5640_352x288);delay(1000);
      Serial.println(F("ACK CMD switch to OV5640_352x288 END"));
    #else
      myCAM.OV5642_set_JPEG_size(OV5642_640x480);delay(1000);
      Serial.println(F("ACK CMD switch to OV5642_640x480 END"));
    #endif
    temp=0xff;
    break;
    case 2:
    #if defined (OV5640_MINI_5MP_PLUS)
      myCAM.OV5640_set_JPEG_size(OV5640_640x480);delay(1000);
      Serial.println(F("ACK CMD switch to OV5640_640x480 END"));
    #else
      myCAM.OV5642_set_JPEG_size(OV5642_1024x768);delay(1000);
      Serial.println(F("ACK CMD switch to OV5642_1024x768 END"));
    #endif
    temp=0xff;
    break;
    case 3:
    #if defined (OV5640_MINI_5MP_PLUS)
      myCAM.OV5640_set_JPEG_size(OV5640_800x480);delay(1000);
      Serial.println(F("ACK CMD switch to OV5640_800x480 END"));
    #else
      myCAM.OV5642_set_JPEG_size(OV5642_1280x960);delay(1000);
      Serial.println(F("ACK CMD switch to OV5642_1280x960 END"));
    #endif
    temp=0xff;
    break;
    case 4:
    #if defined (OV5640_MINI_5MP_PLUS)
      myCAM.OV5640_set_JPEG_size(OV5640_1024x768);delay(1000);
      Serial.println(F("ACK CMD switch to OV5640_1024x768 END"));
    #else
      myCAM.OV5642_set_JPEG_size(OV5642_1600x1200);delay(1000);
      Serial.println(F("ACK CMD switch to OV5642_1600x1200 END"));
    #endif
    temp=0xff;
    break;
    case 5:
    #if defined (OV5640_MINI_5MP_PLUS)
      myCAM.OV5640_set_JPEG_size(OV5640_1280x960);delay(1000);
      Serial.println(F("ACK CMD switch to OV5640_1280x960 END"));
    #else
      myCAM.OV5642_set_JPEG_size(OV5642_2048x1536);delay(1000);
      Serial.println(F("ACK CMD switch to OV5642_2048x1536 END"));
    #endif
    temp=0xff;
    break;
    case 6:
    #if defined (OV5640_MINI_5MP_PLUS)
      myCAM.OV5640_set_JPEG_size(OV5640_1600x1200);delay(1000);
      Serial.println(F("ACK CMD switch to OV5640_1600x1200 END"));
    #else
      myCAM.OV5642_set_JPEG_size(OV5642_2592x1944);delay(1000);
      Serial.println(F("ACK CMD switch to OV5642_2592x1944 END"));
    #endif
    temp=0xff;
    break;
    #if defined (OV5640_MINI_5MP_PLUS)
      case 7:
      myCAM.OV5640_set_JPEG_size(OV5640_2048x1536);delay(1000);
      Serial.println(F("ACK CMD switch to OV5640_2048x1536 END"));
      temp=0xff;
      break;
      case 8:
      myCAM.OV5640_set_JPEG_size(OV5640_2592x1944);delay(1000);
      Serial.println(F("ACK CMD switch to OV5640_2592x1944 END"));
      temp=0xff;
      break;
    #endif
    case 0x10:
    mode = 1;
    start_capture = 1;
    Serial.println(F("ACK CMD CAM start single shoot. END"));
    break;
    case 0x11:
    myCAM.set_format(JPEG);
    myCAM.InitCAM();
    myCAM.set_bit(ARDUCHIP_TIM, VSYNC_LEVEL_MASK);
    break;
    case 0x20:
    mode = 2;
    start_capture = 2;
    Serial.println(F("ACK CMD CAM start video streaming. END"));
    break;
    case 0x30:
    mode = 3;
    temp = 0xff;
    start_capture = 3;
    Serial.println(F("CAM start single shoot. END"));
    break;
    case 0x31:
    temp = 0xff;
    myCAM.set_format(BMP);
    myCAM.InitCAM();
    myCAM.clear_bit(ARDUCHIP_TIM, VSYNC_LEVEL_MASK);
    myCAM.wrSensorReg16_8(0x3818, 0x81);
    myCAM.wrSensorReg16_8(0x3621, 0xA7);
    break;
    default:
    break;
  }
}
if (mode == 1)
{
  if (start_capture == 1)
  {
    myCAM.flush_fifo();
    myCAM.clear_fifo_flag();
    //Start capture
    myCAM.start_capture();
    start_capture = 0;
  }
  if (myCAM.get_bit(ARDUCHIP_TRIG, CAP_DONE_MASK))
  {
    Serial.println(F("ACK CMD CAM Capture Done. END"));
    read_fifo_burst(myCAM);
    //Clear the capture done flag
    myCAM.clear_fifo_flag();
  }
}
else if (mode == 2)
{
  while (1)
  {
    temp = Serial.read();
    if (temp == 0x21)
    {
      start_capture = 0;
      mode = 0;
      Serial.println(F("ACK CMD CAM stop video streaming. END"));
      break;
    }
    if (start_capture == 2)
    {
      myCAM.flush_fifo();
      myCAM.clear_fifo_flag();
      //Start capture
      myCAM.start_capture();
      start_capture = 0;
    }
    if (myCAM.get_bit(ARDUCHIP_TRIG, CAP_DONE_MASK))
    {
      uint32_t length = 0;
      length = myCAM.read_fifo_length();
      if ((length >= MAX_FIFO_SIZE) | (length == 0))
      {
        myCAM.clear_fifo_flag();
        start_capture = 2;
        continue;
      }
      myCAM.CS_LOW();
      myCAM.set_fifo_burst();//Set fifo burst mode
      while ( length-- )
      {
        temp_last = temp;
        temp =  SPI.transfer(0x00);
        if (is_header == true)
        {
        Serial.write(temp);
        }
        else if ((temp == 0xD8) & (temp_last == 0xFF))
        {
        is_header = true;
        Serial.println(F("ACK IMG"));
        Serial.write(temp_last);
        Serial.write(temp);
        }
        if ( (temp == 0xD9) && (temp_last == 0xFF) ) //If find the end ,break while,
        break;
        delayMicroseconds(15);
      }
      myCAM.CS_HIGH();
      myCAM.clear_fifo_flag();
      start_capture = 2;
      is_header = false;
    }
  }
}
else if (mode == 3)
{
  if (start_capture == 3)
  {
  //Flush the FIFO
  myCAM.flush_fifo();
  myCAM.clear_fifo_flag();
  //Start capture
  myCAM.start_capture();
  start_capture = 0;
  }
  if (myCAM.get_bit(ARDUCHIP_TRIG, CAP_DONE_MASK))
  {
    Serial.println(F("ACK CMD CAM Capture Done. END"));
    delay(50);
    uint8_t temp, temp_last;
    uint32_t length = 0;
    length = myCAM.read_fifo_length();
    if (length >= MAX_FIFO_SIZE )
    {
      Serial.println(F("ACK CMD Over size. END"));
      myCAM.clear_fifo_flag();
      return;
    }
    if (length == 0 ) //0 kb
    {
      Serial.println(F("ACK CMD Size is 0. END"));
      myCAM.clear_fifo_flag();
      return;
    }
    myCAM.CS_LOW();
    myCAM.set_fifo_burst();//Set fifo burst mode
    Serial.write(0xFF);
    Serial.write(0xAA);
    for (temp = 0; temp < BMPIMAGEOFFSET; temp++)
    {
      Serial.write(pgm_read_byte(&bmp_header[temp]));
    }
    // SPI.transfer(0x00);
    char VH, VL;
    int i = 0, j = 0;
    for (i = 0; i < 240; i++)
    {
      for (j = 0; j < 320; j++)
      {
        VH = SPI.transfer(0x00);;
        VL = SPI.transfer(0x00);;
        Serial.write(VL);
        delayMicroseconds(12);
        Serial.write(VH);
        delayMicroseconds(12);
      }
    }
    Serial.write(0xBB);
    Serial.write(0xCC);
    myCAM.CS_HIGH();
    //Clear the capture done flag
    myCAM.clear_fifo_flag();
    }
  }
}
uint8_t read_fifo_burst(ArduCAM myCAM)
{
uint8_t temp = 0, temp_last = 0;
uint32_t length = 0;
length = myCAM.read_fifo_length();
Serial.println(length, DEC);
if (length >= MAX_FIFO_SIZE) //512 kb
{
  Serial.println(F("ACK CMD Over size. END"));
  return 0;
}
if (length == 0 ) //0 kb
{
  Serial.println(F("ACK CMD Size is 0."));
  return 0;
}
myCAM.CS_LOW();
myCAM.set_fifo_burst();//Set fifo burst mode
while ( length-- )
{
  temp_last = temp;
  temp =  SPI.transfer(0x00);
  if (is_header == true)
  {
    Serial.write(temp);
  }
  else if ((temp == 0xD8) & (temp_last == 0xFF))
  {
    is_header = true;
    Serial.println(F("ACK IMG END"));
    Serial.write(temp_last);
    Serial.write(temp);
  }
  if ( (temp == 0xD9) && (temp_last == 0xFF) ) //If find the end ,break while,
  break;
  delayMicroseconds(5);
}
myCAM.CS_HIGH();
is_header = false;
return 1;
}
ArduCAM 센서 동작확인
하드웨어 연결, 소프트웨어 코딩이 완료되면 다음과 같이 동작 화면을 확인할 수 있다.
------------------------------------------------------
개발환경 : WINDOWS 10
아두이노 IDE : 1.8.13
------------------------------------------------------
01 연결
- 아두이노와 PC 연결
- 아두이노 IDE 실행
- 메뉴 → 툴 → 보드:아두이노 확인
- 메뉴 → 스케치 → 확인/컴파일

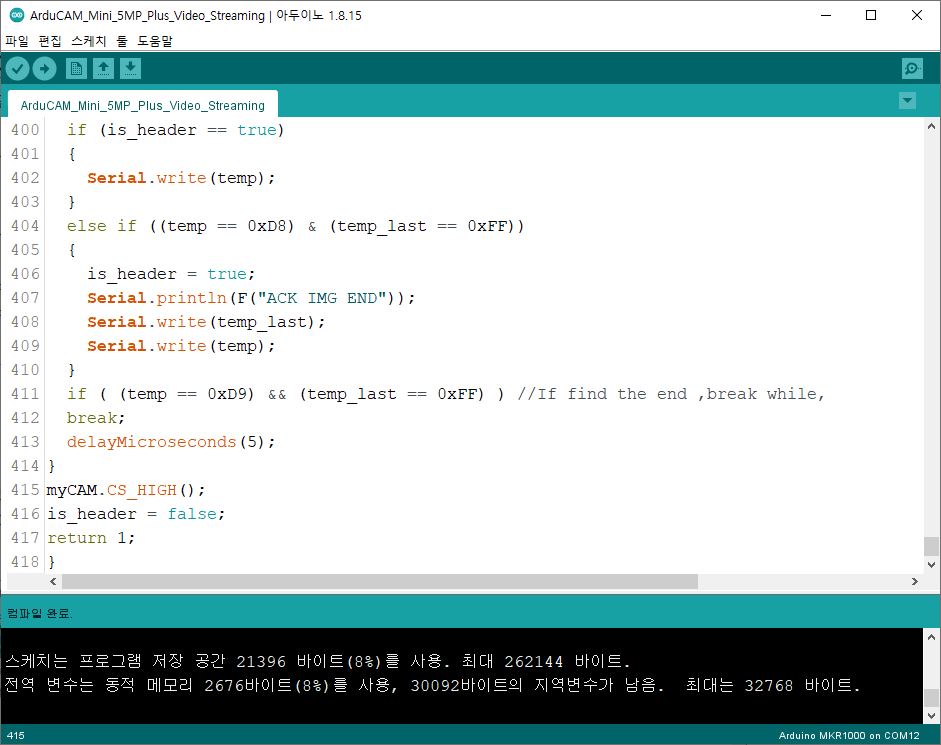
02 컴파일 확인
스케치>확인/컴파일(CTRL+R) 를 선택해서 컴파일을 진행한다.
03 아두이노 업로드
컴파일이 이상없이 완료되면 스케치>업로드(CTRL+U) 를 선택해서 컴파일 파일을 업로드 한다.

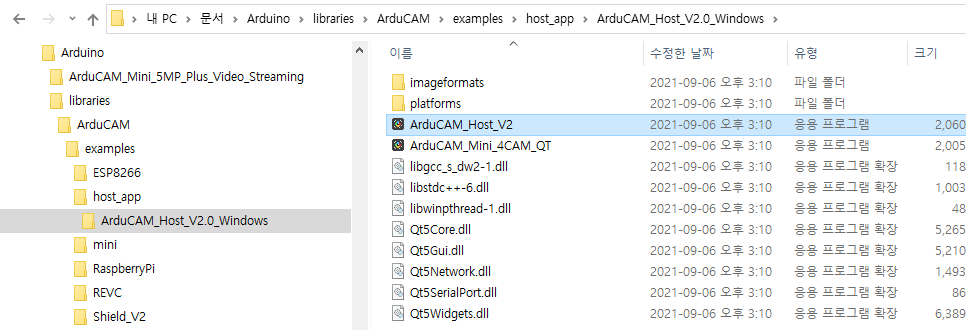
04 동작 확인 - window 프로그램 실행
다음과 같이 ArduCam_Host_V2.exe 파일을 실행한다.
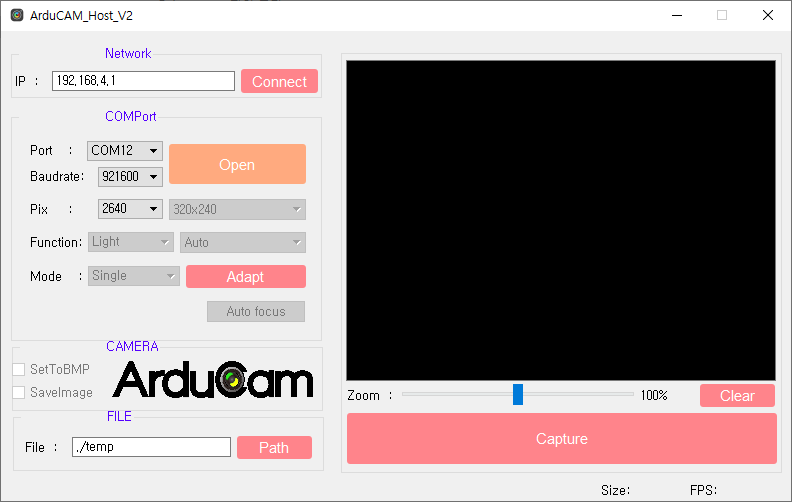
05 동작 확인
Open 클릭 한다.
06 동작 확인
Capture 버튼을 클릭한다.
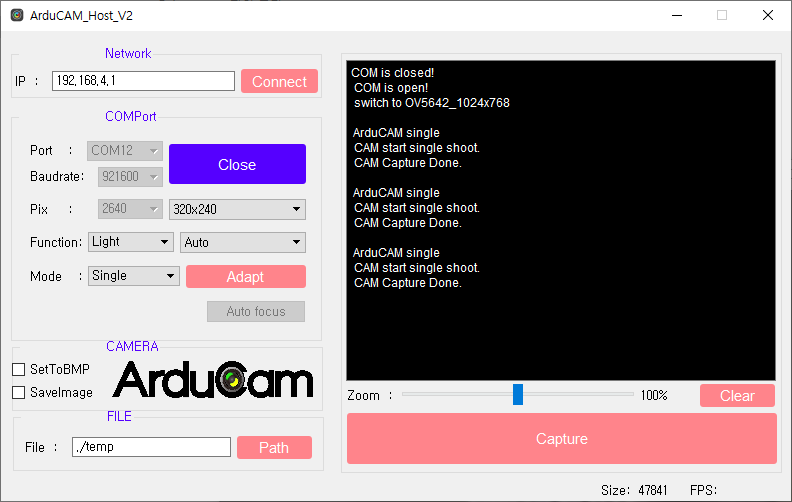
다음과 같이 캡쳐된 이미지가 화면에 나타난다.

마무리
아두이노와 ArduCAM 센서를 연결하고, 간단한 코딩으로 센서를 쉽게 실습할 수 있다.
모두의 아두이노 환경 센서 책
[모두의 아두이노 환경 센서] 책은 예스24, 인터넷 교보문고, 알라딘, 인터파크도서, 영풍문고, 반디앤루니스 , 도서11번가 등에서 구입할 수 있다. 이 책에서는 PMS7003, GP2Y1010AU0F, PPD42NS, SDS011 미세먼지 센서, DHT22 온습도 센서, MH-Z19B 이산화탄소 센서, ZE08-CH2O 포름알데히드 센서, CCS811 총휘발성유기화합물 TVOC, GDK101 방사선(감마선) 센서, MQ-131 오존(O3) 센서, MQ-7 일산화탄소, MICS-4514 이산화질소 센서, MICS-6814 암모니아 센서, DGS-SO2 아황산가스(SO2) 센서, BME280 기압 센서, GUVA-S12SD 자외선(UV) 센서, MD0550 기류 센서, QS-FS01 풍속 센서(Wind speed) 를 사용한다.
모두의 아두이노 환경 센서
아두이노와 센서로 내 건강을 지킬 수 있다!다양한 환경 센서를 실생활 프로젝트에 응용해보자!시중에 판매되고 있는 간이측정기도 센서로 값을 측정합니다. 똑같은 센서를 아두이노에 연결하
book.naver.com
'큐브셋 초소형 인공위성' 카테고리의 다른 글
| CubeSat - MKR1000 센서 정보 OLED에 표시하기 (u8g2 라이브러리) (0) | 2021.09.07 |
|---|---|
| CubeSat - I2C OLED (128X64) (0) | 2021.09.07 |
| CubeSat - Full Wiring Diagram and All Sensors code (0) | 2021.09.06 |
| CubeSat - Adafruit Analog UV Light Sensor Breakout Board (0) | 2021.09.06 |
| CubeSat - DS18B20 Digital Temperature Sensor (0) | 2021.09.05 |
| CubeSat - Sound Detector (SEN-12642) (0) | 2021.09.03 |
| CubeSat - MicroSD Card Breakout Board (0) | 2021.09.02 |
| CubeSat - RTC(Real Time Clock) Breakout Board (0) | 2021.09.02 |


댓글