본 절은 [DS18B20] 아두이노 센서를 사용하기 위해 알아야 할 내용과 실습 방법에 대해 설명한다. 아두이노 센서의 특징, 동작원리, 사양, 연결 핀 배열, 출력 값, 주의사항을 알아본다. 아두이노와 센서를 연결하고, 간단한 코딩으로 센서를 쉽게 실습할 수 있다.
목차
CubeSat - Digital Temperature Sensor


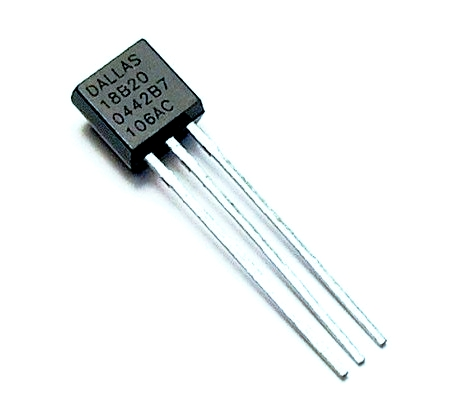
DS18B20 센서란?
이 센서는 매우 정확하며 작동하는 데 외부 구성 요소가 필요하지 않는다. 따라서 몇 개의 연결과 일부 Arduino 코드로 온도를 즉시 감지 할 수 있다!
DS18B20은 0.5˚C 내에서 -55˚C ~ 125˚C의 온도를 감지할 수 있는 다목적 소형 온도 센서다. 하나의 통신 와이어만 필요하지만 저항도 필요하다.
DS18B20 아두이노 센서 특징
DS18B20 센서의 특징은 다음과 같다. 센서는 3V~5.5V 전원을 공급할 수 있다. 활성 온도 변환 중에는 1mA만 소비한다.
* Power Supply 3V to 5.5V
* Current Consumption 1mA
* Temperature Range -55 to 125°C
* Accuracy ±0.5°C
* Resolution 9 to 12 bit (selectable)
* Conversion Time < 750ms
DS18B20 센서 동작 원리
온도 센서의 분해능은 9, 10, 11 또는 12 비트로 사용자가 구성 할 수 있다. 그러나 전원 공급시 기본 분해능은 12 비트 (예 : 0.0625 ° C 정밀도)이다.
DS18B20의 가장 큰 장점 중 하나는 여러 DS18B20이 동일한 1-Wire 버스에 공존 할 수 있다는 것이다. 각 DS18B20에는 공장에서 제작된 고유 한 64 비트 직렬 코드가 있으므로 서로 구별하기가 더 쉽다.
이 기능은 넓은 지역에 분산 된 많은 DS18B20 센서를 제어하려는 경우 큰 이점이 될 수 있다.
https://lastminuteengineers.com/multiple-ds18b20-arduino-tutorial/
https://lastminuteengineers.com/multiple-ds18b20-arduino-tutorial/
lastminuteengineers.com
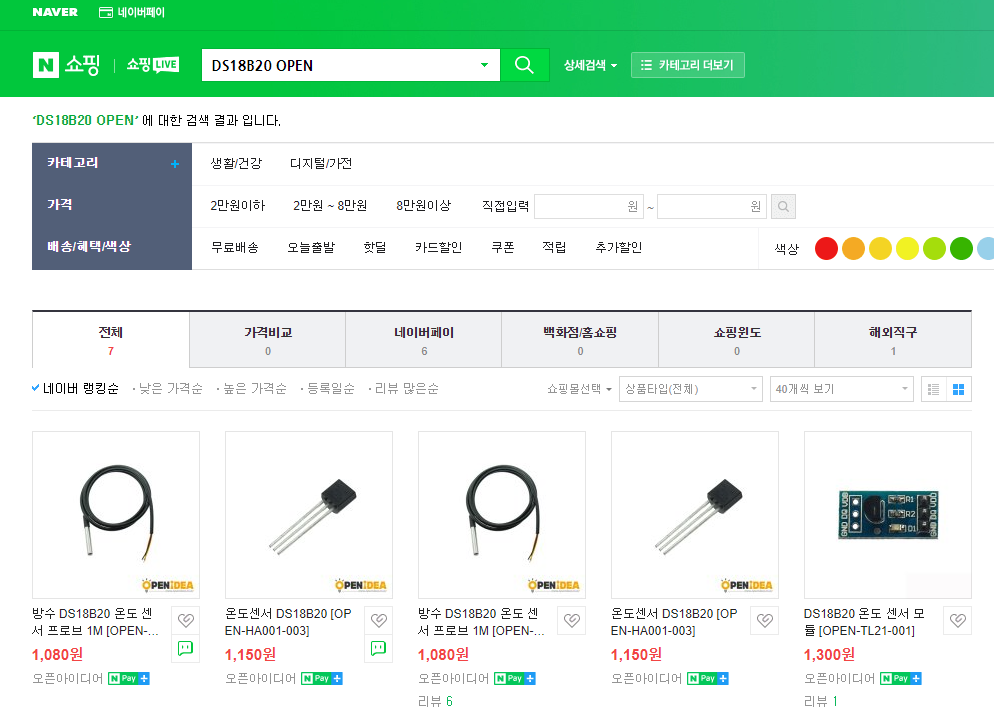
DS18B20 센서 구입하기
[DS18B20 센서]는 알리익스프레스, 네이버 쇼핑몰, 아마존 등에서 센서를 구입할 수 있다. 칩셋, 모듈, 방수 온도 센서등 다양한 종류의 제품들이 판매 되고 있다. 대회측에서는 저항을 연결하는 칩셋을 제공하고 있다.
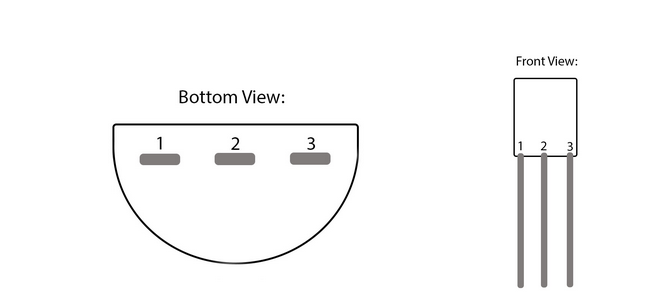
DS18B20 센서 하드웨어 연결
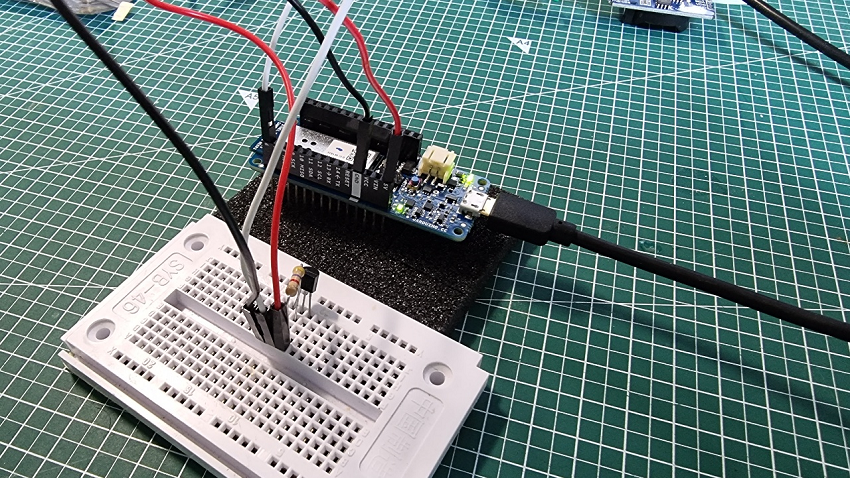
다음과 같이 DS18B20 아두이노 센서를 연결할 수 있다. 5V 케이블(오른쪽)과 데이터 케이블(중앙) 사이에 저항을 연결해야 한다. 전선을 벗겨내고 저항을 그 사이에 납땜할 수 있다. 4.7Kohm 저항을 권장한다.
이 표는 MKR1000과 디지털 온도 센서 사이에 연결할 핀을 보여준다.

MKR1000 보드와 온도센서+저항을 직접적으로 연결한 도면을 보여준다. 가운데 선이 DATA를 의미한다.
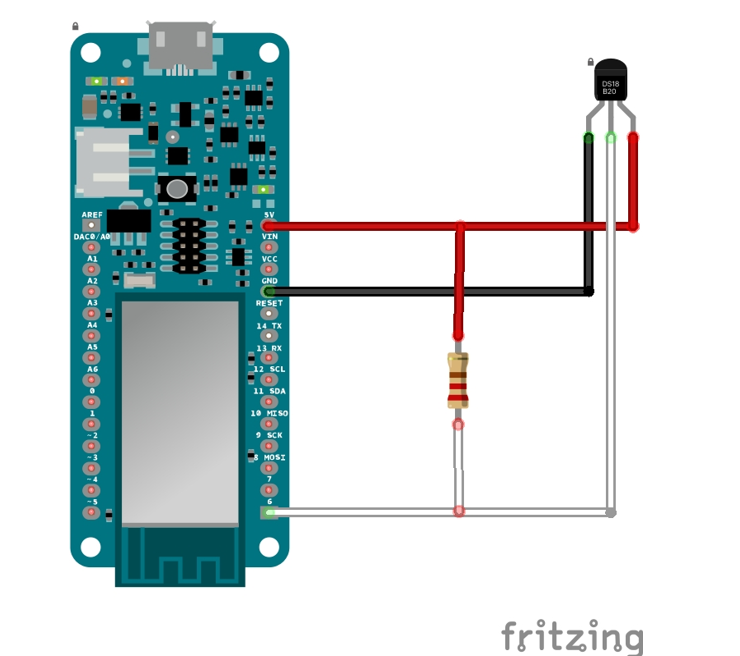
브레드 보드를 사용해서 연결하면 다음과 같다.

DS18B20 센서 라이브러리 설치하기
라이브러리는 다음과 같다.
1. 아두이노 IDE를 연다.
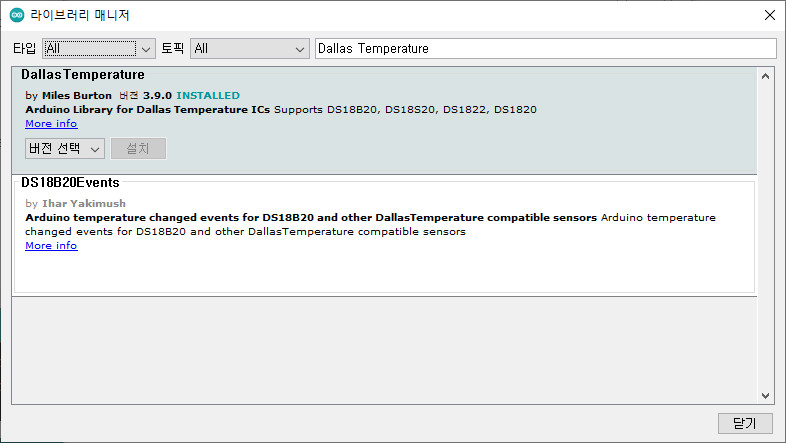
2. 라이브러리 관리자를 연다.
3. "Dallas Temperature"를 검색한 다음 설치를 클릭한다.
4. 라이브러리 상자가 나타나면 모두 설치를 클릭한다.

5. 라이브러리가 설치되면 라이브러리 관리자를 닫을 수 있다.
DS18B20 센서 소프트웨어 코딩
하드웨어 연결이 완료되면, 아두이노 IDE를 이용해 아두이노 센서 소스코드를 코딩할 수 있다.
6. 파일 -> 예제 -> DallasTemperature -> 테스터로 이동한다.

7. ONE_WIRE_BUS가 정의된 위치를 찾는다.
8. 통신선에 6번 핀을 사용하고 있으므로 2번을 6번으로 변경한다.

센서 코드는 다음과 같다.
#include <OneWire.h>
#include <DallasTemperature.h>

// Data wire is plugged into port 2 on the Arduino
#define ONE_WIRE_BUS 6
#define TEMPERATURE_PRECISION 9 // Lower resolution

// Setup a oneWire instance to communicate with any OneWire devices (not just Maxim/Dallas temperature ICs)
OneWire oneWire(ONE_WIRE_BUS);

// Pass our oneWire reference to Dallas Temperature.
DallasTemperature sensors(&oneWire);

int numberOfDevices; // Number of temperature devices found

DeviceAddress tempDeviceAddress; // We'll use this variable to store a found device address

void setup(void)
{
  // start serial port
  Serial.begin(9600);
  Serial.println("Dallas Temperature IC Control Library Demo");

  // Start up the library
  sensors.begin();

  // Grab a count of devices on the wire
  numberOfDevices = sensors.getDeviceCount();

  // locate devices on the bus
  Serial.print("Locating devices...");

  Serial.print("Found ");
  Serial.print(numberOfDevices, DEC);
  Serial.println(" devices.");

  // report parasite power requirements
  Serial.print("Parasite power is: ");
  if (sensors.isParasitePowerMode()) Serial.println("ON");
  else Serial.println("OFF");

  // Loop through each device, print out address
  for(int i=0;i<numberOfDevices; i++)
  {
    // Search the wire for address
    if(sensors.getAddress(tempDeviceAddress, i))
	{
		Serial.print("Found device ");
		Serial.print(i, DEC);
		Serial.print(" with address: ");
		printAddress(tempDeviceAddress);
		Serial.println();

		Serial.print("Setting resolution to ");
		Serial.println(TEMPERATURE_PRECISION, DEC);

		// set the resolution to TEMPERATURE_PRECISION bit (Each Dallas/Maxim device is capable of several different resolutions)
		sensors.setResolution(tempDeviceAddress, TEMPERATURE_PRECISION);

		Serial.print("Resolution actually set to: ");
		Serial.print(sensors.getResolution(tempDeviceAddress), DEC);
		Serial.println();
	}else{
		Serial.print("Found ghost device at ");
		Serial.print(i, DEC);
		Serial.print(" but could not detect address. Check power and cabling");
	}
  }

}

// function to print the temperature for a device
void printTemperature(DeviceAddress deviceAddress)
{
  // method 1 - slower
  //Serial.print("Temp C: ");
  //Serial.print(sensors.getTempC(deviceAddress));
  //Serial.print(" Temp F: ");
  //Serial.print(sensors.getTempF(deviceAddress)); // Makes a second call to getTempC and then converts to Fahrenheit

  // method 2 - faster
  float tempC = sensors.getTempC(deviceAddress);
  if(tempC == DEVICE_DISCONNECTED_C)
  {
    Serial.println("Error: Could not read temperature data");
    return;
  }
  Serial.print("Temp C: ");
  Serial.print(tempC);
  Serial.print(" Temp F: ");
  Serial.println(DallasTemperature::toFahrenheit(tempC)); // Converts tempC to Fahrenheit
}

void loop(void)
{
  // call sensors.requestTemperatures() to issue a global temperature
  // request to all devices on the bus
  Serial.print("Requesting temperatures...");
  sensors.requestTemperatures(); // Send the command to get temperatures
  Serial.println("DONE");


  // Loop through each device, print out temperature data
  for(int i=0;i<numberOfDevices; i++)
  {
    // Search the wire for address
    if(sensors.getAddress(tempDeviceAddress, i))
	{
		// Output the device ID
		Serial.print("Temperature for device: ");
		Serial.println(i,DEC);

		// It responds almost immediately. Let's print out the data
		printTemperature(tempDeviceAddress); // Use a simple function to print out the data
	}
	//else ghost device! Check your power requirements and cabling

  }
}

// function to print a device address
void printAddress(DeviceAddress deviceAddress)
{
  for (uint8_t i = 0; i < 8; i++)
  {
    if (deviceAddress[i] < 16) Serial.print("0");
    Serial.print(deviceAddress[i], HEX);
  }
}
DS18B20 센서 동작확인
하드웨어 연결, 소프트웨어 코딩이 완료되면 다음과 같이 동작 화면을 확인할 수 있다.
------------------------------------------------------
개발환경 : WINDOWS 10
아두이노 IDE : 1.8.13
------------------------------------------------------
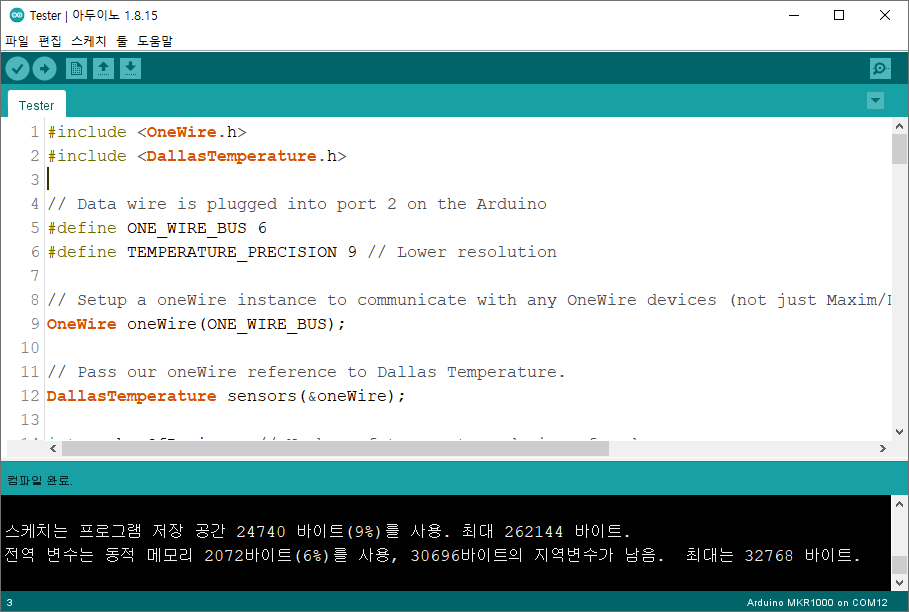
01 컴파일 확인
스케치>확인/컴파일(CTRL+R) 를 선택해서 컴파일을 진행한다.
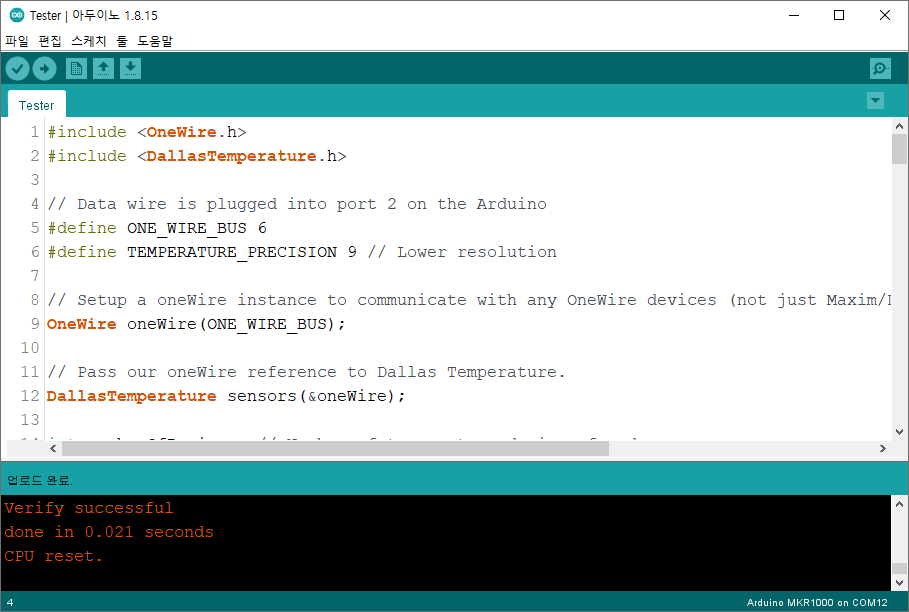
02 MKR1000에 업로드
컴파일이 이상없이 완료되면 스케치>업로드(CTRL+U) 를 선택해서 컴파일 파일을 업로드 한다.
03 동작 확인
다음과 같이 동작을 확인할 수 있다.

마무리
아두이노와 DS18B20 센서를 연결하고, 간단한 코딩으로 센서를 쉽게 실습할 수 있다.
모두의 아두이노 환경 센서 책
[모두의 아두이노 환경 센서] 책은 예스24, 인터넷 교보문고, 알라딘, 인터파크도서, 영풍문고, 반디앤루니스 , 도서11번가 등에서 구입할 수 있다. 이 책에서는 PMS7003, GP2Y1010AU0F, PPD42NS, SDS011 미세먼지 센서, DHT22 온습도 센서, MH-Z19B 이산화탄소 센서, ZE08-CH2O 포름알데히드 센서, CCS811 총휘발성유기화합물 TVOC, GDK101 방사선(감마선) 센서, MQ-131 오존(O3) 센서, MQ-7 일산화탄소, MICS-4514 이산화질소 센서, MICS-6814 암모니아 센서, DGS-SO2 아황산가스(SO2) 센서, BME280 기압 센서, GUVA-S12SD 자외선(UV) 센서, MD0550 기류 센서, QS-FS01 풍속 센서(Wind speed) 를 사용한다.
모두의 아두이노 환경 센서
아두이노와 센서로 내 건강을 지킬 수 있다!다양한 환경 센서를 실생활 프로젝트에 응용해보자!시중에 판매되고 있는 간이측정기도 센서로 값을 측정합니다. 똑같은 센서를 아두이노에 연결하
book.naver.com
'큐브셋 초소형 인공위성' 카테고리의 다른 글
| CubeSat - I2C OLED (128X64) (0) | 2021.09.07 |
|---|---|
| CubeSat - Full Wiring Diagram and All Sensors code (0) | 2021.09.06 |
| CubeSat - Adafruit Analog UV Light Sensor Breakout Board (0) | 2021.09.06 |
| CubeSat - OV5642 ArduCam Mini Module Camera Shield 5MP Plus (0) | 2021.09.06 |
| CubeSat - Sound Detector (SEN-12642) (0) | 2021.09.03 |
| CubeSat - MicroSD Card Breakout Board (0) | 2021.09.02 |
| CubeSat - RTC(Real Time Clock) Breakout Board (0) | 2021.09.02 |
| CubeSat HM3301-Grove - Laser PM2.5 Sensor (0) | 2021.09.02 |


댓글